Abby's Guide to Outdoor Power Equipment (Lawn Mowers, Snow Blowers, Chain Saws and more)
Username Password
Discussions Reviews More Guides
Abby’s Guide > Outdoor Power Equipment (Lawn Mowers, Snow Blowers, Chain Saws and more) > Discussions > Help with Carburetor Cleaning

Outdoor Power Equipment (Lawn Mowers, Snow Blowers, Chain Saws and more) Discussions

Search For:
nibbler


Joined: Mar 5, 2004
Points: 751

Help with Carburetor Cleaning
Original Message   Feb 6, 2008 8:02 pm
One of my neighbours just gave me his lightly used Sears 10/28 snowblower. He is physically unable to use it any more and was having problems with it for the last couple of years. I suspect the main problem was lack of use and old gas. The machine looks practically new and is very clean. Its in better overall shape than my machine. The only two things I've found missing are the knob on the gear shift and the bolt that holds the top of the tube that the oil dip stick goes into. The engine would not start when I got it.

I took the cowling off and low and behold, the end of the tube from the primer bulb was frayed at the carburetor end. I cut off about 1/4" and put it back on. I've bought a new tube and will replace the old one as soon as it stops snowing and the sun comes out.

The engine starts up but now surges. I've put some Sea Foam into the gas and let it run for about 10 minutes. The engine is running better and does perform better under load. It still needs work.

According to what I've read from searches on this forum and on the Tecumseh Technician's Handbook for 3 to 11HP L-Head Engines the next thing is to take apart the carburetor and clean it. I've never done a carburetor disassembly, cleaning, rebuild before so any advice on cleaning agents, things to watch out for, errors in the handbook or any other advice people would care to offer would be appreciated. I will be getting a carburetor kit from the local L&G since I'm positive gaskets and O-rings need to be replaced.

I don't have the engine serial number but will post it once the snow stops ( Thursday morning is the current prediction).

If I still have a problem then it will be time to look at the governor.
Replies: 1 - 20 of 20View as Outline
borat


Joined: Nov 10, 2007
Points: 2692

Re: Help with Carburetor Cleaning
Reply #1   Feb 6, 2008 9:04 pm
If I were you, I wouldn't be jumping in too deep right off.  First thing to do is to ensure you gave a good clean unobstructed fuel supply to the carb.  If that is good,  I would pull the float bowl off, clean out any dirt/water or ice that might be in it.  Gently take the float off and inspect the float needle and float needle seat for debris and varnish.  You can use a paper clip or straight pin to clean the fuel inlet hole in the float needle seat and blow air into the fuel line inlet.  That will ensure you have good fuel supply into the carb.    If there is a screw on the bottom of the float bowl, it can be adjusted to eliminate surging.  Give that a shot and let us know how it goes.
mech12


Joined: Feb 20, 2006
Points: 273

Re: Help with Carburetor Cleaning
Reply #2   Feb 7, 2008 6:39 pm
if the carb is adjustable, idle mixture as well as high speed, i would go ahead and throw in a kit.   if the "adjustments" are fixed remove both screws and shoot some carb cleaner in there and blow with compressed air.  remove bowl nut and do same.   1 thing though DO NOT remove inlet seat.   if it not leaking do not mess with that.
borat


Joined: Nov 10, 2007
Points: 2692

Re: Help with Carburetor Cleaning
Reply #3   Feb 7, 2008 7:35 pm
mech12 wrote:
if the carb is adjustable, idle mixture as well as high speed, i would go ahead and throw in a kit.   if the "adjustments" are fixed remove both screws and shoot some carb cleaner in there and blow with compressed air.  remove bowl nut and do same.   1 thing though DO NOT remove inlet seat.   if it not leaking do not mess with that.


What's an "inlet seat"?  Would it be what I think is the float needle seat?
nibbler


Joined: Mar 5, 2004
Points: 751

Re: Help with Carburetor Cleaning
Reply #4   Feb 7, 2008 8:25 pm
While fiddling to get the engine running I removed the main adjustment screw and drained the bowl. The top of the screw is a needle and is what adjusts the fuel flow into the main nozzle. It had a varnish like deposit on it which I cleaned off by scraping and using a plastic scrubbing pad. I noticed the O-Ring was stiff and cracked. I've fiddled with it a fair amount and while I can improve the sound of the engine while it is running it still surges. According to the book there are some gaskets and O-rings that should be replaced when there are signs of deterioration.

The float controls how much gas comes into the bowl by opening and closing a valve that is formed from an inlet needle and an inlet valve seat. The valve seat is pressed into the passageway that leads to the inlet fitting. The inlet fitting is what the fuel line is attached to.

There is a diagram on page 10 of the manual and a description of the process on page 22.

I will take the bowl apart and clean it out as recommended but I have a hunch I'm going to have replace all the rubber seals ( o-rings and gaskets) The book also has a few other service recommendations. I need to make space on my bench.
donjag


i've gone to find myself,if i'm here when you arrive,keep me here until i get back.

Location: menasha,wisconsin
Joined: Apr 25, 2007
Points: 142

Re: Help with Carburetor Cleaning
Reply #5   Feb 7, 2008 9:39 pm
the rebuild kit is around 20 bucks,it is pretty simple,the little clip for the needle goes a certain way,the book tells you,and the little o ring with a groove on it,that also goes in a certain way,when you take off the needle and clip,there is a little o ring in there,when you get that out and cleaned the carb real good,put the new o ring in so the groove is going in so you can not see it.then re assemble,set your float 11/64ths,set the screws,1 turn out on the side,1 and a half turns out for the bottom.good luck.

nibbler


Joined: Mar 5, 2004
Points: 751

Re: Help with Carburetor Cleaning
Reply #6   Feb 8, 2008 9:33 am
Thanks for the info, any recommendations for carburetor cleaner?
borat


Joined: Nov 10, 2007
Points: 2692

Re: Help with Carburetor Cleaning
Reply #7   Feb 8, 2008 11:46 am
nibbler wrote:
Thanks for the info, any recommendations for carburetor cleaner?


There is no substitution for physically removing the dirt.  I'm rebuilding/modifying two Mikuni VM28 carbs for my 1976 Yamaha RD400.  I soaked both carbs in low odor varsol for two days then began to disassemble and clean.  The grime on the exterior came off good but the contaminants on the inside were considerably more stubborn.  When I drifted out the needle jets, I was surprised with how much contamination there was on them.  Fortunately, I'm replacing  the needle jets, the air jets and pilot jets as part of the modification.  The best way to really clean the carb is to tear it down as much as you can, clean orifices and passages with a thin flexible wire, blow WD40 through as many orifices and passages as possible then finish off with compressed air. 
donjag


i've gone to find myself,if i'm here when you arrive,keep me here until i get back.

Location: menasha,wisconsin
Joined: Apr 25, 2007
Points: 142

Re: Help with Carburetor Cleaning
Reply #8   Feb 8, 2008 9:15 pm
gumout works really well,but any carb cleaner is fine,like borat said,get a thin wire to get at the holes and blow air.hope this helps

nibbler


Joined: Mar 5, 2004
Points: 751

Re: Help with Carburetor Cleaning
Reply #9   Feb 9, 2008 10:13 am
OK sounds like I just need to dig out some thin copper wire and the big magnifying glass. Should be fun. Hopefully at the end of it I'll here the screaming roar of a big snow machine ( apologies to Snoopy vs the Red Baron).

Thanks
This message was modified Feb 9, 2008 by nibbler
borat


Joined: Nov 10, 2007
Points: 2692

Re: Help with Carburetor Cleaning
Reply #10   Feb 9, 2008 2:10 pm
I just finished cleaning and rebuilding my two Mikunis.  Lots of little parts to clean and replace (in this case).  One picture shows the shiny new replacement parts and the not so clean original parts.  The other shot is of the 32 year old carbs all cleaned up, re-assembled and pretty much ready to go..


This message was modified Feb 9, 2008 by borat
nibbler


Joined: Mar 5, 2004
Points: 751

OK - Now What
Reply #11   Feb 16, 2008 7:54 am
I carefully removed the carburettor, cleaned it and started to put it back on the engine. I found I was missing some bolts, don't ask how I thought I had stored them all. Went out and got some replacements only to have the head of one break off while turning it into the casting. It looks like I may have to drill it out and possibly tap the hole. Is this the correct method or is there some way of getting the machine screw out? there is a small nub sticking out.
donjag


i've gone to find myself,if i'm here when you arrive,keep me here until i get back.

Location: menasha,wisconsin
Joined: Apr 25, 2007
Points: 142

Re: Help with Carburetor Cleaning
Reply #12   Feb 16, 2008 8:18 am
you can maybe try using a easy out,you drill into the broken screw,put this threaded thing(the easy out)into the hole and turn it out.i find there is NOTHING easy about this.or if you have enough meat sticking out,you might try a vice grips put on very carefully and slowly try turning out,but be careful,if you use the vicegrips there is a good chance you will only get one try at it.good luck.

borat


Joined: Nov 10, 2007
Points: 2692

Re: Help with Carburetor Cleaning
Reply #13   Feb 16, 2008 5:12 pm
Is there enough clearance to get at the broken screw with a hack saw blade or possibly a thin Dremmel cutting disk?  If so, cut a thin slot in the middle of the stub (and surrounding surface if necessary).  Make it deep enough to get a flat screwdriver into it and back it out.  If you can get a slot in it, it will come out easily.
nibbler


Joined: Mar 5, 2004
Points: 751

Re: Help with Carburetor Cleaning
Reply #14   Feb 16, 2008 7:30 pm
Thanks for the info.

Unfortunately the screw in question is a 6-32 x 1/2" so its kind of small to start with. I'm not sure why it broke off, it didn't feel like I was forcing it but with a screw that small I might not know my own strength.

I have used so called screw extractors before and this thing is too small for the smallest that I have. There is a bit of a nub and I do have a Dremel tool so I'll try the cut a slot technique. The only problem is the weather forecast is for freezing rain so I have to wait for sunnier times. I tried running the engine and there was no more hesitation however it did start to race at one point and the bowl seems to leak when I turn the engine off. I closed the fuel cutoff and ran the engine dry so the dripping  didn't occur but I have a hunch I have to open it up and look at the float and inlet valve assembly.

This sure is a learning experience.
nibbler


Joined: Mar 5, 2004
Points: 751

Status 2008/03/14
Reply #15   Mar 14, 2008 10:34 am
  1. The carburetor controls runs a lot more freely and the thing looks cleaner;
  2. The fuel and primer lines have been replaced;
  3. I did not replace the welsh plugs, everything else from the kit has been used except the large O-ring, see below;
  4. The engine either runs at a very fast idle or dies;
  5. I can keep it running by keeping the throttle open, the idle adjustment screw doesn't seem to help;
  6. The large O-Ring that goes on the top rim of the float bowl was too big, I've used the old one as an interim solution;
  7. The O-ring on the idle adjustment is flopping around on the screw shaft;
  8. I may have the rods from the governor in the wrong holes of the two plates they connect to;
  9. When I try to blow snow the engine does not react to increased load and the snow dribbles out the chute;
  10. There is a loose spring n the manual throttle assembly;
  11. I have not cut the slot and removed the screw.
Aside from tha,t things are working perfectly. I'm also learning a lot of respect for anyone who can fix and adjust a carburetor. I will keep plugging away
nibbler


Joined: Mar 5, 2004
Points: 751

Some Success
Reply #16   Mar 14, 2008 9:43 pm
I looked at the Tecumseh manual again and found the following things have happened:
  1. As I suspected the manual throttle plate that one of the rods to the governor connects to is supposed to be up and not down.
  2. I've used a dremel tool to cut a slot in the remainder of the broken machine screw. Is still stuck and the slot is starting to deform. I'm not sure if heating the unit will help but the only other solution is to drill it out and tap the hole;
  3. I have now got the correct sized O-ring installed on the fuel cup;
  4. When the throttle was set to "Fast" the engine would rev way to high. In fact oil was starting to come out of the breather tube. I repositioned the governor lever and it now runs better. I have to get a tachometer to set the correct high speed RPM but we are now in the ball park.
  5. Gas still leaks out if I'm not running the engine. I think the inlet seat needs to be reinstalled, I suspect its askew;
  6. I haven't figured out what is wrong with the idle adjust screw. there is a small brass washer on it outside of the O-ring. The washer isn't fixed to anything, isn't pressing against the o-ring and moves back and forth along the shaft. I did find one diagram for a different type of carburetor that showed a spring between the head of the screw and the brass washer. The spring pressed the washer against the o-ring. I also noticed that when I prime thee appears to be a misty jet coming out of that area. I will reread the installation instructions.
borat


Joined: Nov 10, 2007
Points: 2692

Re: Help with Carburetor Cleaning
Reply #17   Mar 14, 2008 11:37 pm
 Not to be a smart ass but you had me laughing for a while there. 

 I admire your perseverance and patience. 

However,personally, I'd have tossed that carb into orbit and bought a new one by now.

Good luck to you and thanks for the updates. 

nibbler


Joined: Mar 5, 2004
Points: 751

Re: Help with Carburetor Cleaning
Reply #18   Mar 16, 2008 1:13 am
No probs.

As to why I haven't gotten a new one:
  1. This is the first time I have done a carburetor cleaning, its a learning experience and therefore perseverance is the name of the game, I have to learn from my mistakes;
  2. I an cheap.
  3. This is for the "spare" snowblower, I can afford to have it out of service while I "play".
As far as I can see most have my problems are from inexperience and a fair bit of dumb luck.

I am learning and thats the main reason for posting, so people can learn from my mistakes, giving then a good laugh is an added bonus.
This message was modified Mar 16, 2008 by nibbler
Moderator Denis


Location: CAN
Joined:
Points: 638

Re: Help with Carburetor Cleaning
Reply #19   Mar 16, 2008 1:34 am
borat wrote:
I just finished cleaning and rebuilding my two Mikunis.  Lots of little parts to clean and replace (in this case).  One picture shows the shiny new replacement parts and the not so clean original parts.  The other shot is of the 32 year old carbs all cleaned up, re-assembled and pretty much ready to go..
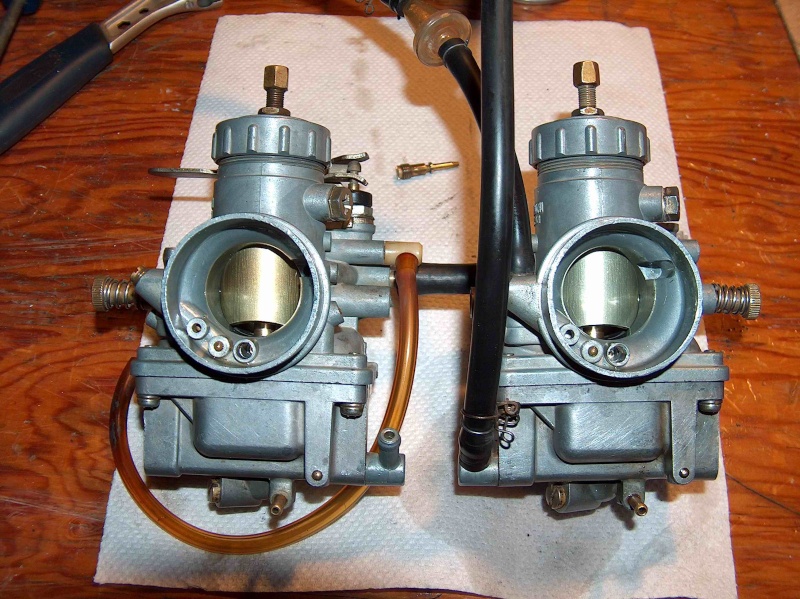
   

Borat, I remember in 1973, I owned a Kawasaki semi-trail 90cc, that cames a with a mikunis carburator, very good quality, they really never gum out, well to say the truth, the engine never stops running hehehehe I was 14 years old you imagine, gas at that time was

49.9 cents a gallon :)) Yep Mikunis the only thing is on to 2 stroke engine vibration is present and going down and up pit sand the mikunis got easy disajusted, You are using 2 mikunis parallel :)) keep a flat screwdriver under seat you may need it, buy the way you are doing a pretty nice clean job on it, congradulation

This message was modified Mar 16, 2008 by Denis


borat


Joined: Nov 10, 2007
Points: 2692

Re: Help with Carburetor Cleaning
Reply #20   Mar 16, 2008 2:35 pm
Thanks Denis.

The Yamaha RD's are hot rod street bikes from the early 1970s.  The twins run pretty smooth compared to the small single Kawasaki you were riding.  The Mikuni VM28s hold their adjustment very well.  The idle screw and air screws both are spring loaded and don't move much.  They are the only two adjustment screws on the carbs.  I'm presently working on converting the points ignition system to an all electronic system.   I will also be installing a special CDI that I can plug a hand held controller into for adjusting the engine timing while the engine is running.  The programmer can hold up to ten programmed timing curves depending on what type of riding you want to do.  If you want to run with high fuel efficiency and cooler engine, there's a timing curve for that.  If you want all out horse power (for short durations) there's a curve for that.  Two stroke engines are sensitive to timing changes.  The timing requirements are considerably different at 3000 rpm vs. 10000 rpm.  Points ignition cannot deliver the timing performance that a electronic dynamic system can. 

I'm still a few weeks away from having the RD400 ready.  Will post some pics when it's ready. 

Replies: 1 - 20 of 20View as Outline
Outdoor Power Equipment (Lawn Mowers, Snow Blowers, Chain Saws and more) Guide   •   Discussions  Reviews  
AbbysGuide.com   About Us   Terms of Use   Privacy Policy   Contact Us
Copyright 1998-2024 AbbysGuide.com. All rights reserved.
Site by Take 42